Difference between revisions of "SSH/Socks5 Proxy"
(Created page with " Category:SSH Category:Proxy") |
|||
| (9 intermediate revisions by the same user not shown) | |||
| Line 1: | Line 1: | ||
{{DISPLAYTITLE: SSH Socks5 Proxy}} |
|||
Creating a proxy with SSH to a server one has full control over in order to get content that is restricted to a certain coutry or region. |
|||
== Prerequisites == |
|||
* A server runnning SSH with a global address. |
|||
* Full control on the server to create users a.k.a root access. |
|||
* SSH client that understands the <tt>-D</tt> option e.g. [http://www.openssh.com/ OpenSSH] or [http://www.chiark.greenend.org.uk/~sgtatham/putty/download.html PuTTY]. |
|||
* A web browser capable of using a Socks5 proxy. e.g. [https://www.mozilla.org/en-US/firefox/new/?utm_source=firefox-com&utm_medium=referral Firefox] |
|||
* A proxy switcher like [http://getfoxyproxy.com/ FoxyProxy] [optional]. |
|||
== Howto == |
|||
=== Server Setup === |
|||
The first thing do do is create a restricted or jailed users. Although the jailed users is more secure a restricted user is used as it is more universally applicable. |
|||
==== User Creation ==== |
|||
The assumption is that this is Linux server on other Unix-like hosts the commands need to be adjusted. The user's home directory will be located under <tt>/var/restricted</tt> which is probably not present and has to be created first. The user's name is for this example going to be <tt>socks5</tt>. |
|||
mkdir -p /var/restricted |
|||
useradd -d /var/restricted/socks5 -u 25002 -s /bin/rbash socks5 |
|||
To make this users truly restricted a few things need to be put in place and changed. First password authentication is not recommended here hence the <tt>.ssh</tt> directory. Further a <tt>.hushlogin</tt> for faster logins without the <tt>motd</tt>. And a few tools running a while loop while the connection is open to prevent timeouts. Using <tt>rbash</tt> prevents this users from using any binaries not in the path and the user can't change directories. |
|||
chmod 500 /var/restricted/socks5 |
|||
mkdir /var/restricted/socks5/.ssh |
|||
chown socks5 /var/restricted/socks5/.ssh |
|||
chmod 100 /var/restricted/socks5/.ssh |
|||
touch /var/restricted/socks5/.huslogin |
|||
chown root:root /var/restricted/socks5/.hushlogin |
|||
chmod 444 /var/restricted/socks5/.hushlogin |
|||
Additionally the login profile and the bin directory with the necessary binaries are created. |
|||
cat <<PROFILE > /var/restricted/socks5/.bash_profile |
|||
PATH="\${HOME}/bin" |
|||
export PATH |
|||
PROFILE |
|||
chown root:root /var/restricted/socks5/.bash_profile |
|||
chmod 444 /var/restricted/socks5/.bash_profile |
|||
mkdir /var/restricted/socks5/bin |
|||
chown root:root /var/restricted/socks5/bin |
|||
chmod 555 /var/restricted/socks5/bin |
|||
cd /var/restricted/socks5/bin |
|||
ln -s /bin/date |
|||
ln -s /bin/true |
|||
ln -s /bin/sleep |
|||
Copy the public ssh key to the <tt>/var/restricted/socks5/.ssh/authorized_keys</tt> file. See <tt>man ssh-keygen</tt> for more information how to achieve this. Finally adjust the permission of the <tt>authorized_keys</tt> file. |
|||
cat <span class="input">id_rsa.pub</span> >> /var/restricted/socks5/.ssh/authorized_keys |
|||
chown socks5:root /var/restricted/socks5/.ssh/authorized_keys |
|||
chmod 400 /var/restricted/socks5/.ssh/authorized_keys |
|||
==== SSHD Setup ==== |
|||
This only applies if the <tt>AllowUsers</tt> configuration is already in used. Due to frequent ssh brute force attack it is one the recommended measures to take curb unwanted logins. The other one is only allow ssh-key authentication. After the change restart the <tt>sshd</tt> process (sample below is from a debian squeeze system, your mileage may vary). |
|||
sed -i.bak.$( date +%F ) \ |
|||
-e 's/^\(AllowUsers.*\)/\1 <span class="highlight">socks5</span>/' \ |
|||
/etc/ssh/sshd_config |
|||
/etc/init.d/ssh restart |
|||
=== Client Setup === |
|||
For this example the Firefox browser with FoxyProxy is being used. Other browser will work as well as long as they support the [http://en.wikipedia.org/wiki/SOCKS SOCKS5 protocol]. |
|||
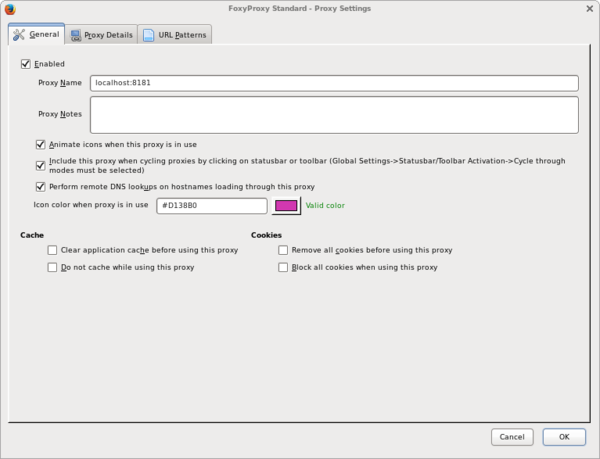
Download the FoxyProxy Standard edition and got the intial configuration screen. Click on the [Add New Proxy] button to configure the SSH SOCKS Proxy. Like shown in the screenshot below. |
|||
[[Image:Socks5-foxyproxy-general.png|600px]] |
|||
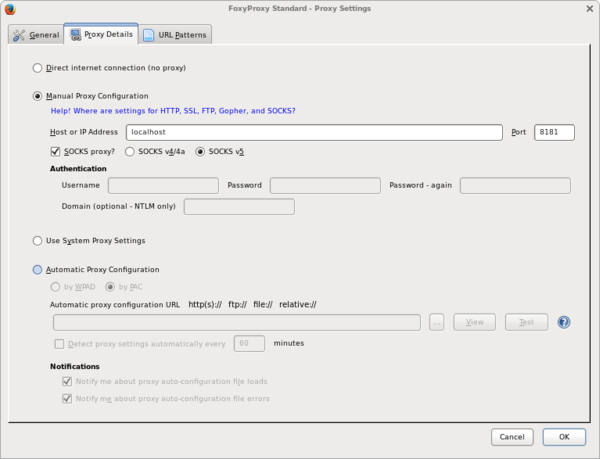
When done continue with the tab [Proxy Details] and enter the details as shown below. |
|||
[[Image:Socks5-foxyproxy-proxy_details.png|600px]] |
|||
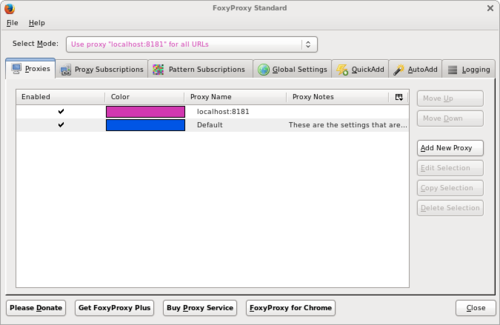
When finished click [OK] returning to the initial screen. Select the newly created proxy <tt>localhost:8181</tt> for all URLs. <br /> |
|||
Note: For a production setting it is probably more appropriate to also use [URL Patterns] to limit the proxy usage to only the required target sites. |
|||
[[Image:Socks5-foxyproxy-initial.png|500px]] |
|||
=== Running the Socks Proxy === |
|||
The last piece is to initiate the ssh connection to the target host and create the SOCKS5 proxy. |
|||
ssh -D 8181 socks5@<span class="input">TARGET-HOST</span> "while true; do date; sleep 10; done" |
|||
Once done confirm the new IP address is being used by hopping to [http://whatismyip.com what is my ip ]. |
|||
[[Category:SSH]] |
[[Category:SSH]] |
||
Latest revision as of 20:55, 14 September 2014
Creating a proxy with SSH to a server one has full control over in order to get content that is restricted to a certain coutry or region.
Prerequisites
- A server runnning SSH with a global address.
- Full control on the server to create users a.k.a root access.
- SSH client that understands the -D option e.g. OpenSSH or PuTTY.
- A web browser capable of using a Socks5 proxy. e.g. Firefox
- A proxy switcher like FoxyProxy [optional].
Howto
Server Setup
The first thing do do is create a restricted or jailed users. Although the jailed users is more secure a restricted user is used as it is more universally applicable.
User Creation
The assumption is that this is Linux server on other Unix-like hosts the commands need to be adjusted. The user's home directory will be located under /var/restricted which is probably not present and has to be created first. The user's name is for this example going to be socks5.
 mkdir -p /var/restricted
 useradd -d /var/restricted/socks5 -u 25002 -s /bin/rbash socks5
To make this users truly restricted a few things need to be put in place and changed. First password authentication is not recommended here hence the .ssh directory. Further a .hushlogin for faster logins without the motd. And a few tools running a while loop while the connection is open to prevent timeouts. Using rbash prevents this users from using any binaries not in the path and the user can't change directories.
chmod 500 /var/restricted/socks5
mkdir /var/restricted/socks5/.ssh
chown socks5 /var/restricted/socks5/.ssh
chmod 100 /var/restricted/socks5/.ssh
touch /var/restricted/socks5/.huslogin
chown root:root /var/restricted/socks5/.hushlogin
chmod 444 /var/restricted/socks5/.hushlogin
Additionally the login profile and the bin directory with the necessary binaries are created.
cat <<PROFILE > /var/restricted/socks5/.bash_profile
PATH="\${HOME}/bin"
export PATH
PROFILE

chown root:root /var/restricted/socks5/.bash_profile
chmod 444 /var/restricted/socks5/.bash_profile
mkdir /var/restricted/socks5/bin
chown root:root /var/restricted/socks5/bin
chmod 555 /var/restricted/socks5/bin
cd /var/restricted/socks5/bin
ln -s /bin/date
ln -s /bin/true
ln -s /bin/sleep
Copy the public ssh key to the /var/restricted/socks5/.ssh/authorized_keys file. See man ssh-keygen for more information how to achieve this. Finally adjust the permission of the authorized_keys file.
cat id_rsa.pub >> /var/restricted/socks5/.ssh/authorized_keys
chown socks5:root /var/restricted/socks5/.ssh/authorized_keys
chmod 400 /var/restricted/socks5/.ssh/authorized_keys
SSHD Setup
This only applies if the AllowUsers configuration is already in used. Due to frequent ssh brute force attack it is one the recommended measures to take curb unwanted logins. The other one is only allow ssh-key authentication. After the change restart the sshd process (sample below is from a debian squeeze system, your mileage may vary).
sed -i.bak.$( date +%F ) \
  -e 's/^\(AllowUsers.*\)/\1 socks5/' \
  /etc/ssh/sshd_config

/etc/init.d/ssh restart
Client Setup
For this example the Firefox browser with FoxyProxy is being used. Other browser will work as well as long as they support the SOCKS5 protocol.
Download the FoxyProxy Standard edition and got the intial configuration screen. Click on the [Add New Proxy] button to configure the SSH SOCKS Proxy. Like shown in the screenshot below.
When done continue with the tab [Proxy Details] and enter the details as shown below.
When finished click [OK] returning to the initial screen. Select the newly created proxy localhost:8181 for all URLs.
Note: For a production setting it is probably more appropriate to also use [URL Patterns] to limit the proxy usage to only the required target sites.
Running the Socks Proxy
The last piece is to initiate the ssh connection to the target host and create the SOCKS5 proxy.
ssh -D 8181 socks5@TARGET-HOST "while true; do date; sleep 10; done"
Once done confirm the new IP address is being used by hopping to what is my ip .


