Difference between revisions of "CUPS/AirPrint"
(Created page with "The other day I came across an article about AirPrint and wondered if I can share my printer over the WiFi network and print out over the CUPS installation on an Ubuntu insta...") |
|||
| (24 intermediate revisions by 2 users not shown) | |||
| Line 1: | Line 1: | ||
{{DISPLAYTITLE:AirPrint with CUPS}} |
|||
The other day I came across an article about AirPrint and wondered if I can share my printer over the WiFi network and print out over the [[CUPS]] installation on an Ubuntu installation. |
|||
The other day I came across an article about AirPrint and wondered if I can share my printer over the WiFi network and print out over [[CUPS]] on an Ubuntu installation. |
|||
== Prerequisuites == |
== Prerequisuites == |
||
=== Server Side === |
|||
* [http://cups.org/ CUPS] |
* [http://cups.org/ CUPS] |
||
* [http://avahi.org/ Avahi] |
* [http://avahi.org/ Avahi] |
||
* [http://www.openprinting.org/printers A CUPS compatible printer] |
* [http://www.openprinting.org/printers A CUPS compatible printer] |
||
=== Client Side (iDevice) === |
|||
* iPhone > 3GS, iPad, iPod touch > 3rd Genration |
|||
* Wi-Fi Network |
|||
=== Client Side (MacOS X) === |
|||
* Host running MacOS X |
|||
* Network connection |
|||
== Configuration Server Side == |
|||
=== CUPS === |
|||
There is very little that needs to be done in CUPS to make this work the heavy lifting is on the Avahi side of things. But in order to print from an iDevice a few things need to be checked and if required change the configuration. |
|||
==== Printer is working ==== |
|||
Before attempting to print from your iDevices it is probably wise to make sure the target printer is properly working locally over CUPS on the local machine. Configuration of the printer in CUPS is beyond the scope of this article tho. |
|||
==== Printer is shared ==== |
|||
In order to print over the network the printer in question CUPS must ''share'' the printer. You can check this with your favorite webbrowser under http://localhost:631 or via <tt>lpotions</tt> command. |
|||
lpoptions -p <span class="input"><PrinterName></span> | grep --color printer-is-shared= |
|||
auth-info-required=none [snip] <span class="highlight">printer-is-accepting-jobs=</span>true printer-is-shared=true [snip] |
|||
The <tt>lpotions</tt> command is putting its whole output on a single line hence I suggest to use the <tt>--color</tt> option with grep to easily spot the value in question. Obviously the value should be set to <tt>true</tt>. |
|||
If the printer in question is not shared a quick <tt>lpadmin</tt> magic will correct that. |
|||
lpadmin -p <span class="input"><PrinterName></span> -o printer-is-shared=true |
|||
==== cupsd.conf ==== |
|||
Most likely the <tt>/etc/cups/cupsd.conf</tt> needs a bit of massaging. |
|||
On Ubuntu some people report the following line has to be added: |
|||
ServerAlias * |
|||
It is also necessary to ensure host from the Wi-Fi network can print to the printer. |
|||
<Policy WiFi> |
|||
<Limit Send-Document Send-URI Hold-Job Release-Job Restart-Job Purge-Jobs Set-Job-Attributes |
|||
Create-Job-Subscription Renew-Subscription Cancel-Subscription Get-Notifications |
|||
Reprocess-Job Cancel-Current-Job Suspend-Current-Job Resume-Job CUPS-Move-Job |
|||
Cancel-Job CUPS-Authenticate-Job CUPS-Get-Document> |
|||
Order allow,deny |
|||
Allow from <span class="input">10.10.10.0/24</span> |
|||
</Limit> |
|||
</Policy> |
|||
Where <tt>Allow from</tt> should be the IP Address of your Wi-Fi network. |
|||
=== Avahi === |
|||
Avahi requires a service file under <tt>/etc/avahi/services</tt> that is where the <tt>airprint-generate.py</tt> script comes into play. Run the script as root |
|||
sudo python airprint-generate.py |
|||
This will generate files called <tt>AirPrint-<span class="input"><PrinterName></span>.service</tt>. Copy these files to the Avahi services directory. |
|||
sudo cp AirPrint-<span class="input"><PrinterName></span>.service /etc/avahi/services |
|||
Avahi will pick up the new service on the fly without a restart. |
|||
Time to check if the configuration worked. On the same machine punch in the following command. |
|||
avahi-browse _universal._sub._ipp._tcp |
|||
+ wlan0 IPv6 AirPrint <span class="input"><PrinterName></span> @ <span class="input"><hostname></span> Internet Printer local |
|||
+ wlan0 IPv4 AirPrint <span class="input"><PrinterName></span> @ <span class="input"><hostname></span> Internet Printer local |
|||
The IPv6 line will only show up if you have it enabled. |
|||
== Configuration Client Side == |
|||
=== iDevice === |
|||
Only for debugging purposes install the free [http://itunes.apple.com/us/app/discovery-bonjour-browser/id305441017?mt=8 Bonjour Browser]. Use it to see if your iDevice can see the Avahi print services. |
|||
To check the configuration go to say the Mail app open a message press the arrow button to show the options. Click on print and the printer should come up with the name specified in the Avahi service file. |
|||
<gallery widths=320px heights=480px perrow=1> |
|||
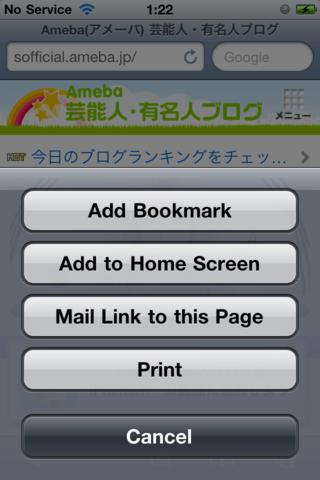
File:01-AirPrint-iOS-Safari.png | In Safari tapping on the box with the arrow will bring up the action dialog. |
|||
File:02-AirPrint-iOS-Options.png | Under the actions is <tt>[Print]</tt> tapping that will get show a the print dialog. |
|||
File:03-AirPrint-iOS-Select_Printer.png | Initially there won't be a printer listed tapping on the <tt>Select Printer</tt> will bring up a choice of printers. |
|||
File:04-AirPrint-iOS-Available_Printers.png | The printer setup in Linux with the prefix of AirPrint show up. In this case the physical printer is used. |
|||
File:05-AirPrint-iOS-Print.png | The selected printer shows up in the <tt>Printer Options</tt> dialog. Hitting the <tt>[Print]</tt> button will do. |
|||
</gallery> |
|||
=== MacOS X === |
|||
To have better visibility into what is being advertised in the Bonjour protocol the [http://www.tildesoft.com/ Bonjour Browser] is a very light weight application to help visualize the services advertised. |
|||
Adding a printer that is advertised via Bonjour / Avahi should be just a few clicks away. Navigate to the <tt>System Preferences</tt> and then click on <tt>Print & Fax</tt> |
|||
[[Image:MacOS-System_Preferences.png|link=|System Preferences]] <tt>--></tt> [[Image:MacOS-Print_and_Fax.png|link=|Print & Fax]] |
|||
The first dialog is the empty <tt>Print & Fax</tt> one clicking on the plus <tt>[+]</tt> sign on the lower left side will open the setup window. |
|||
[[Image:01-AirPrint-MacOS-Print_Fax-Dialog-Empty.png|left|374px|link=|frame|Image 1: Empty <tt>Print & Fax</tt> window]] <br style="clear: both" /> |
|||
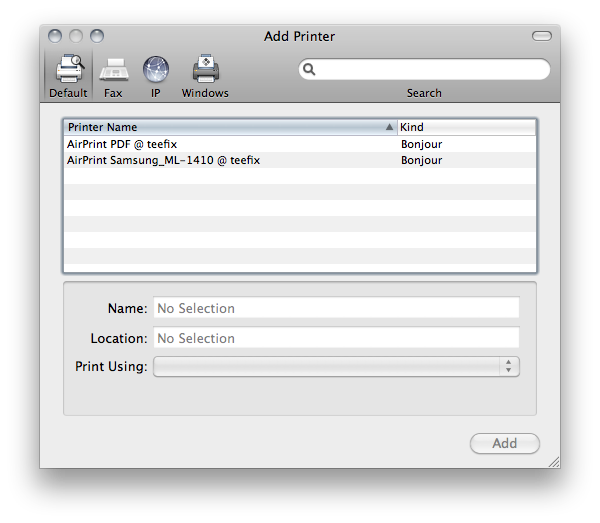
In the <tt>Add Printer</tt> dialog we see two printers announcing themselves with the prefix <tt>AirPrint</tt> these were setup on the Linux hosts and are advertised via Zeroconf. |
|||
[[Image:02-AirPrint-MacOS-Add_Printer-Init.png|left|300px|link=|frame|Image 2: Initial <tt>Add Printer</tt> window]] <br style="clear: both" /> |
|||
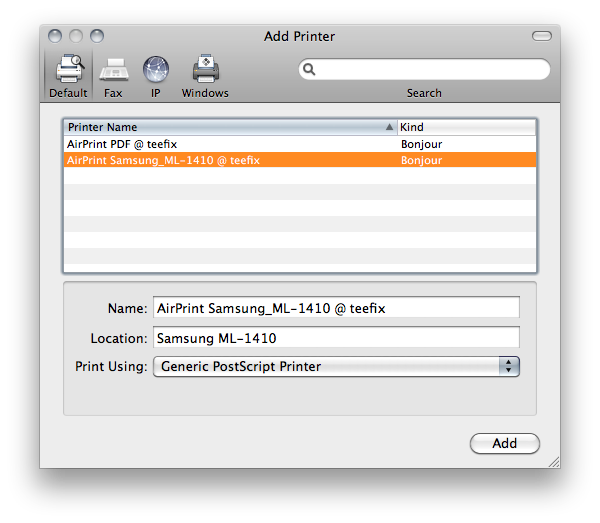
After select the physical printer from the choices it takes a while until all the user editable fields are popluated. Once that is done the <tt>[Add]</tt> button will finalize the addition of the new printer. |
|||
[[Image:03-AirPrint-MacOS-Add_Printer-Select.png|left|300px|link=|frame|Image 3: Selected and ready window for adding printer]] <br style="clear: both" /> |
|||
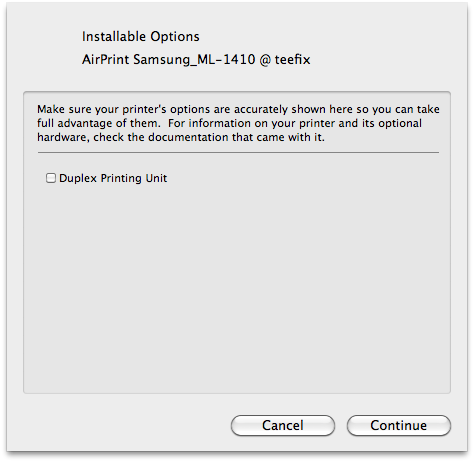
Next up is the confirmation which we needs not changes in this particular case. Hitting <tt>[Continue]</tt> will bring up the <tt>Print & Fax</tt> window once more. |
|||
[[Image:04-AirPrint-MacOS-Add_Printer-Confirmation.png|left|237px|link=|frame|Image 4: Confirmation window]] <br style="clear: both" /> |
|||
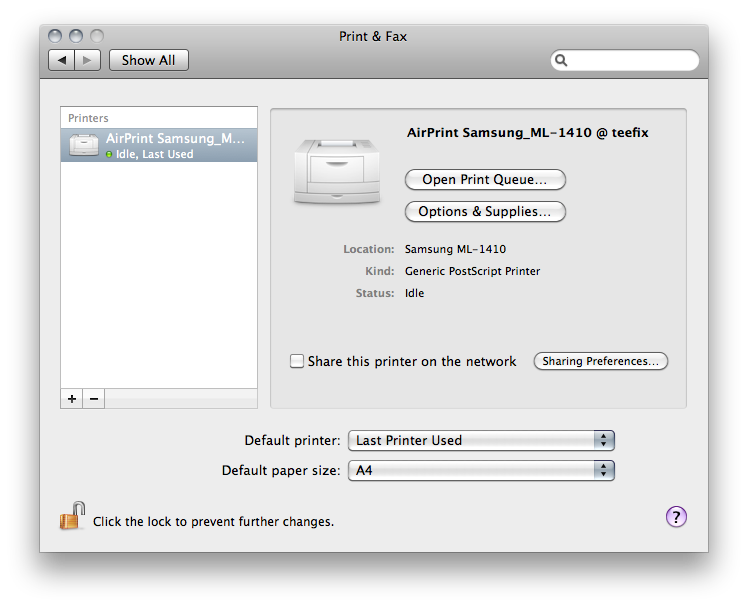
In the list of printers the new <tt>AirPrint</tt> unit has been added. |
|||
[[Image:05-AirPrint-MacOS-Print_Fax-Dialog-Finished.png|left|374px|link=|frame|Image 5: Populated <tt>Print & Fax</tt> window]] <br style="clear: both" /> |
|||
== References == |
== References == |
||
* [http://www.finnie.org/2010/11/13/airprint-and-linux/ Ryan Finnie's AirPrint and Linux Article] |
* [http://www.finnie.org/2010/11/13/airprint-and-linux/ Ryan Finnie's AirPrint and Linux Article] |
||
* [http://atxconsulting.com/posts/Automatically_generate_AirPrint_Avahi_service_files_for_CUPS_printers/ Generate AirPrint Avahi service files] |
* [http://atxconsulting.com/posts/Automatically_generate_AirPrint_Avahi_service_files_for_CUPS_printers/ Generate AirPrint Avahi service files] |
||
* [http://support.apple.com/kb/ht4356 Apple's AirPrint 101] |
|||
[[Category:CUPS]] |
[[Category:CUPS]] |
||
[[Category:Zeroconf]] |
[[Category:Zeroconf]] |
||
[[Category:Linux]] |
[[Category:Linux]] |
||
[[Category:Printing]] |
|||
[[Category:MacOS]] |
|||
Latest revision as of 12:19, 24 May 2012
The other day I came across an article about AirPrint and wondered if I can share my printer over the WiFi network and print out over CUPS on an Ubuntu installation.
Prerequisuites
Server Side
Client Side (iDevice)
- iPhone > 3GS, iPad, iPod touch > 3rd Genration
- Wi-Fi Network
Client Side (MacOS X)
- Host running MacOS X
- Network connection
Configuration Server Side
CUPS
There is very little that needs to be done in CUPS to make this work the heavy lifting is on the Avahi side of things. But in order to print from an iDevice a few things need to be checked and if required change the configuration.
Printer is working
Before attempting to print from your iDevices it is probably wise to make sure the target printer is properly working locally over CUPS on the local machine. Configuration of the printer in CUPS is beyond the scope of this article tho.
In order to print over the network the printer in question CUPS must share the printer. You can check this with your favorite webbrowser under http://localhost:631 or via lpotions command.
lpoptions -p <PrinterName> | grep --color printer-is-shared=
auth-info-required=none [snip] printer-is-accepting-jobs=true printer-is-shared=true [snip]
The lpotions command is putting its whole output on a single line hence I suggest to use the --color option with grep to easily spot the value in question. Obviously the value should be set to true.
If the printer in question is not shared a quick lpadmin magic will correct that.
lpadmin -p <PrinterName> -o printer-is-shared=true
cupsd.conf
Most likely the /etc/cups/cupsd.conf needs a bit of massaging.
On Ubuntu some people report the following line has to be added:
ServerAlias *
It is also necessary to ensure host from the Wi-Fi network can print to the printer.
<Policy WiFi>
  <Limit Send-Document Send-URI Hold-Job Release-Job Restart-Job Purge-Jobs Set-Job-Attributes
         Create-Job-Subscription Renew-Subscription Cancel-Subscription Get-Notifications
         Reprocess-Job Cancel-Current-Job Suspend-Current-Job Resume-Job CUPS-Move-Job
         Cancel-Job CUPS-Authenticate-Job CUPS-Get-Document>
    Order allow,deny
    Allow from 10.10.10.0/24
   </Limit>
</Policy>
Where Allow from should be the IP Address of your Wi-Fi network.
Avahi
Avahi requires a service file under /etc/avahi/services that is where the airprint-generate.py script comes into play. Run the script as root
sudo python airprint-generate.py
This will generate files called AirPrint-<PrinterName>.service. Copy these files to the Avahi services directory.
sudo cp AirPrint-<PrinterName>.service /etc/avahi/services
Avahi will pick up the new service on the fly without a restart.
Time to check if the configuration worked. On the same machine punch in the following command.
avahi-browse _universal._sub._ipp._tcp
+  wlan0 IPv6 AirPrint <PrinterName> @ <hostname>             Internet Printer     local
+  wlan0 IPv4 AirPrint <PrinterName> @ <hostname>             Internet Printer     local
The IPv6 line will only show up if you have it enabled.
Configuration Client Side
iDevice
Only for debugging purposes install the free Bonjour Browser. Use it to see if your iDevice can see the Avahi print services.
To check the configuration go to say the Mail app open a message press the arrow button to show the options. Click on print and the printer should come up with the name specified in the Avahi service file.

In Safari tapping on the box with the arrow will bring up the action dialog.
Under the actions is [Print] tapping that will get show a the print dialog.
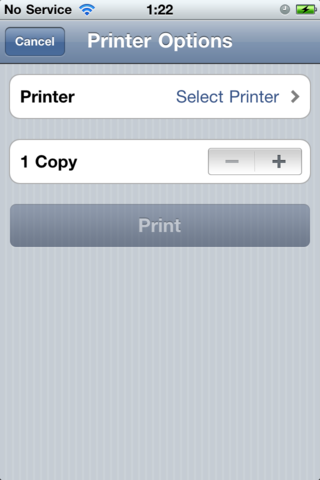
Initially there won't be a printer listed tapping on the Select Printer will bring up a choice of printers.

The printer setup in Linux with the prefix of AirPrint show up. In this case the physical printer is used.
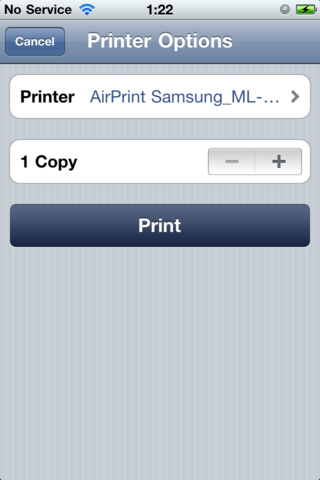
The selected printer shows up in the Printer Options dialog. Hitting the [Print] button will do.


MacOS X
To have better visibility into what is being advertised in the Bonjour protocol the Bonjour Browser is a very light weight application to help visualize the services advertised.
Adding a printer that is advertised via Bonjour / Avahi should be just a few clicks away. Navigate to the System Preferences and then click on Print & Fax
![]() -->
--> ![]()
The first dialog is the empty Print & Fax one clicking on the plus [+] sign on the lower left side will open the setup window.
In the Add Printer dialog we see two printers announcing themselves with the prefix AirPrint these were setup on the Linux hosts and are advertised via Zeroconf.
After select the physical printer from the choices it takes a while until all the user editable fields are popluated. Once that is done the [Add] button will finalize the addition of the new printer.
Next up is the confirmation which we needs not changes in this particular case. Hitting [Continue] will bring up the Print & Fax window once more.
In the list of printers the new AirPrint unit has been added.